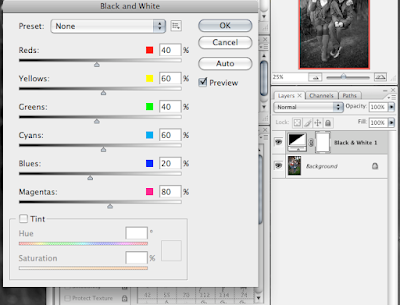
The Photoshop panel:
*This panel is made available when you add a "black and white" adjustment layer to your photo.
The Lightroom panel:
*This panel is made available when you are in the development tab while working on a given photograph.
This is an example of zeroing out all channels except for the red channel, which I have converted to 100%.
Notice how bright the skin becomes and how dark the eyes are. Photographers manipulate the red channel, mostly, to apply an infrared look to images.
Now for the green channel. Achieved by applying the same technique as above with the exception of zeroing out all channels but the green, which is increased to 100%.
Here we gained skin tone back as well as detail in the grass.
And the blue channel. Achieved by applying the same technique as above with the exception of zeroing out all channels but the blue, which is increased to 100%.
With the blue channel you will increase the intensity of the shadows but more than likely will maintain good skin tone. It offers a slightly darker look to an image.
You will typically find a balance between using all three channels. In Photoshop I'm partial to leaving blue around 60 or 70% and altering the other two channels to my liking. The sum of all three channels should be 100% or very close. Otherwise you start to get images that do not look natural.
Photoshop and Lightroom, as well as other image editing applications, have made this very easy. This use to be achieved by literally putting red, green or blue filters on your lens. Then you had to adjust your exposure accordingly, normally by 2 or 3 stops. This was of course when we were shooting film.
You could still do it this way with digital. However applying the filter post image capture allows you to change the look of the image and leaves you open to a lot more options. If you use the filter on your lens you are essentially filtering that channel of light from ever hitting your sensor. Thus removing it from the file information. Less file info, less image quality.
Thought this could be useful for those wanting to learn more on the editing side of things. Keep your questions coming, I have been getting some good ones.


1 comment:
very cool.. i been working on my black and white.
Post a Comment